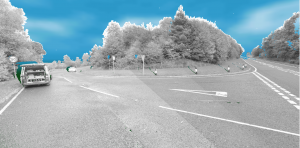
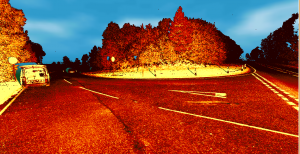
![]() Version 10.1 of RelMo is now available for download. As well as fixing a few minor bugs, version 10.1 adds in support for intensity data in point cloud data. Intensity data can now be viewed using a number of different colour schemes to enhance the visibility of tyre and other marks which may not be displayed clearly in full colour mode. A greyscale display of the colour data is also now available. From version 10 a completely new ribbon-based interface is provided and has been redesigned from the bottom up as a 64 bit program to take full advantage of any additional memory available. In particular this has a significant effect on handling point clouds. Version 10 will happily load and display tens or even hundreds of millions of points in real time due to a revolutionary way of displaying the points. For example, with a 40 million point cloud display rates of 10 – 15 frames/s have been achieved. Virtual surveying within the cloud has never been easier with the addition of new surveying tools and a ‘pause-edit’ feature to allow movement around the scene while editing. A 32 bit version is still available for users who do not have a 64-bit operating system.
Version 10.1 of RelMo is now available for download. As well as fixing a few minor bugs, version 10.1 adds in support for intensity data in point cloud data. Intensity data can now be viewed using a number of different colour schemes to enhance the visibility of tyre and other marks which may not be displayed clearly in full colour mode. A greyscale display of the colour data is also now available. From version 10 a completely new ribbon-based interface is provided and has been redesigned from the bottom up as a 64 bit program to take full advantage of any additional memory available. In particular this has a significant effect on handling point clouds. Version 10 will happily load and display tens or even hundreds of millions of points in real time due to a revolutionary way of displaying the points. For example, with a 40 million point cloud display rates of 10 – 15 frames/s have been achieved. Virtual surveying within the cloud has never been easier with the addition of new surveying tools and a ‘pause-edit’ feature to allow movement around the scene while editing. A 32 bit version is still available for users who do not have a 64-bit operating system.
 The most obvious change in this release of RelMo is the introduction of a ribbon bar to contain all the controls and commands you might want to use. This follows the design principles of the latest versions of Microsoft Office. The available themes have been updated too so that you can use a version of the ribbon which looks very much like Office 2007, 2010 or Office 2013.
The main change under the surface however is the introduction of a full 64-bit version of RelMo. This allows RelMo to utilise as much memory as you have available. For point clouds in particular this means RelMo can now deal with as many points as you care to throw at it, provided of course that you have sufficient memory!
As a rough guide, a 8 Gb machine can import and display around 50 million points, 16 Gb machines can handle about 130 million points and a 32 Gb machine something like 300 million points. This should be sufficient for most users! What you may care to do however is to export only the area of interest from your laser scanning software and not everything you have captured. Due to their nature laser scans often capture data far removed from the area of interest and there is rarely any benefit to displaying data from a hedge in a field 300 m away from the roadway you have surveyed! Exporting only the area of interest from the scanning software allows RelMo to display more detail in that area and results in a higher frame rate when flying or zooming through the scene.
Users of 32 bit machines will be pleased to learn that a 32 bit version is also still available. This looks and operates just as the 64 bit version but point cloud handling is restricted to a maximum of 5 million points. the RelMo3 viewer program and the demo version of RelMo are only provided in 32 bit versions.
The handling of point cloud data has been radically updated and a completely new display routine for point cloud data has been written. Essentially this new display creates a series of ‘levels of detail’ so that point clouds containing tens of millions and even hundreds of millions of points can be viewed efficiently and smoothly. The basic principle is that if you are viewing the area or volume containing the points from a distance, the size on screen is smaller. As a result not as many points need to be displayed. If you are closer, then more points are displayed. Ultimately if you are close enough, then all the points visible within the field of view are displayed.
To support the point cloud data, new import routines have been written to allow the import of the popular LAS and LAZ point cloud file formats. LAZ files are highly compressed and are around 7 – 20% of the size of the equivalent LAS or PNT files so their use is highly recommended. For example a 50 million point cloud is about 2.4 Gb in size when stored in a LAS file. The same data when stored in a LAZ file is a mere 230 Mb.
Since LAZ files are so efficient at storing data, a new function to convert PTS and LAS files to LAZ format is provided within RelMo. Please note that to avoid memory issues, this is quite a slow process, so for larger files you may want to take a break and make a cup of coffee while it performs the conversion! An option to export the point cloud data contained within RelMo as a LAZ file is also available.
RelMo now also uses similar techniques to store point cloud data in its own rlm files. As with LAZ file compression, this results in a massive reduction in the overall file size. So if you import a PTS file of several gigabytes, don’t be surprised when the resultant RelMo file is only a few hundred megabytes!! All the data is still there, it is just highly compressed. The various levels of detail are recreated from the source data during the file loading process and there is a progress bar to show progress during this phase of loading.
 The virtual surveying tools available to create a conventional survey from point cloud data have also been improved considerably. As you move the cursor around the survey simply click to add a point to a line. The cursor destination will be highlighted as you move around the survey and as soon as you click the mouse, the cursor will snap to that point. As before virtual surveying is only available in 3D views but the orthographic and locked-orthographic views have been updated to make this process far easier. The locked-orthographic view is particularly useful as it maintains an overhead view of the scene, much like a 2D plan view. Virtual surveying is now far easier than performing a conventional survey at the scene! Virtual surveying works by creating a conventional RelMo point at the same physical location as the cloud point and linking that as appropriate using whatever line style you choose. The resultant survey can then be triangulated as a normal RelMo survey to provide a surface onto which you can animate objects.
Another major feature is the introduction of an option to float a view away from the main window. The floating view can then be added to another monitor allowing a proper dual-display system. The floating view contains its own ribbon bar, specific to whatever type of view is displayed. For example you might want a 3D view on one monitor and a 2D view on the other monitor. When performing virtual surveying in 3D, you can then see the 2D plan taking form as you survey. Separate controls to show or hide the point cloud display in 2D and 3D are provided to facilitate that scenario. In principle you can have more than one floating view, so that if you have a triple or quadruple monitor system, you could have a different view on each monitor. Each of the views remains synchronised with the other views so any editing in one view is reflected in the other views automatically.
Numerous smaller enhancements have also been written. As always, these are mostly hidden from you and all you should see is an improvement is the way in which they work. For example the undo/redo system now utilises the temporary files folder to maintain the files necessary to support this functionality. This removes the need to store these files in memory which in turn results in lower overall memory usage and a more stable platform. The undo/redo system is now rather more intelligent and only saves that data which is necessary. This means that when working with large point cloud files, unless you make a change to the point cloud data itself (by removing points etc.) the point cloud data is maintained between calls to undo/redo resulting in a significant speed increase.
